Step 1
Identify route which rainwater will take.
Step 2
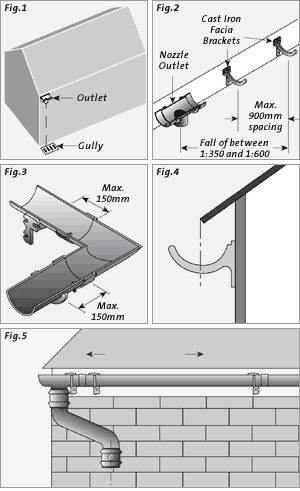
Locate gully/connection to drain and position outlet, taking into account offset projection. (Fig. 1)
Step 3
Approximately 75mm – 100mm from the end of the run fit a bracket, taking into account the fall down to the outlet.
Note: For other brackets see ‘General Notes‘.
Step 4
Ensure brackets are installed so that centre of gutter is beneath the tile edge. (Fig. 4)
See installation advice, general re: Fascia Board.
Step 5
Position gutters loosely within brackets and assess installation for fall and offset position to rainwater pipe. Make adjustments as required. (Fig. 5)
Fix the remaining gutter brackets at maximum centres of 900mm (more frequently in areas prone to high snowfall) along the fall line (as shown in Fig. 2).
Additional brackets should be fitted at a maximum of 150mm from angles and outlets (as shown in Fig. 3). Brackets should be fixed using corrosion resistant wood screws 5mm x 25mm round or pan headed.
Use plumbline or string for alignment when bracketing.
Please Note: When using OG and moulded profiles, we recommend that fascia brackets are used wherever possible.

